Now that tub decisions are made, one of the most integral relationships is the Drum to the bed plate. How big, what are they made of…?
The Drum is the most important part of the beater & second comes the bedplate. These to parts do most of the work of the pulping. The cylinder that the drum is made of, I found, was the hardest part to find. I stuck to an 8" diameter drum that was 8" long. There are lots of manufacturing methods to create a cylinder of that size. I looked at larger cylinders (13" - 15") but they were either cost prohibitive (you had to buy a 20' section), or they weighed too much (60 - 80lbs.) or really, really expensive (large aluminum cylinder - $400 - $700). 6" tubes and pipes are much easier to find, yet that doesn't give a lot of water depth in the beater (1/2 of the drum diameter). I found an 8" O.D.-7.5" I.D. X 8" long tube. $108.00 and weighs 14 lbs. You can get a 10" O.D. DOM (Drawn Over Mandrel) but the wall size is really thick and heavy for not much more. Bigger than that and the company would not guarantee that it was completely round (outside yes, inside not). All of these were carbon steel. Aluminum was easily double & for Stainless Steel triple or quadruple the price.
From the local "Industrial Metal Supply", I purchased 24 - 3/16" x 1/2" x 8" steel bars for the blades, 2 - 3/16" x 8" x 8" for the end plates on the drum, 8 - 1/8" x 3/4" x 8" stainless and 8 - 1/8" x 1/2" x 8" stainless bars for the bedplate. On the drum, the 24 bars will be welded around the drum every 15°.
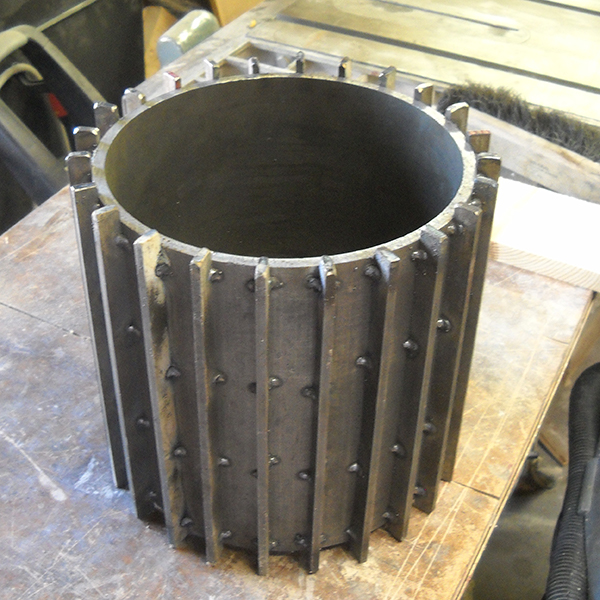
The drum will have caps welded to the ends. The drum will be mounted on a 1" stainless, keyway'd shaft, 18" long (actually 24" eventually). The drum will have collars on it with set screws to attach it to the shaft.
OK, that was the plan. Here's when things started to go awry. As previously stated, the drum will be mounted to the shaft by set collars. But how? I can't just butt them up against the drum because of two problems: One, they could hold the drum in position but it wouldn't hold it stationary. The drum would spin freely in between the two collars. Two, the collars are on the outside of the drum and I didn't have the room to put the collars on the outside. The shaft needs to go into the tub and won't with the collars on the outside of the drum. So what is the solution? Mount the collars on the inside of the drum and attach them to the drum sides. They are zinc coated, so they really can't be welded without causing clouds of dangerous gas. How the hell is that going to happen?
The person helping me with the metal cutting and welding at the time was/is my neighbor, Phil. He suggested that we take the end plates and cut spokes in them to allow access to the inside. "What a great Idea Phil!" Since Phil was a biker from way back, he cut them into Maltese Crosses. How cool was that. He got them welded on and got a mounting hole drilled in them perfectly in the center. The side hole is drilled one drill size bigger than the shaft to make alignment easier.
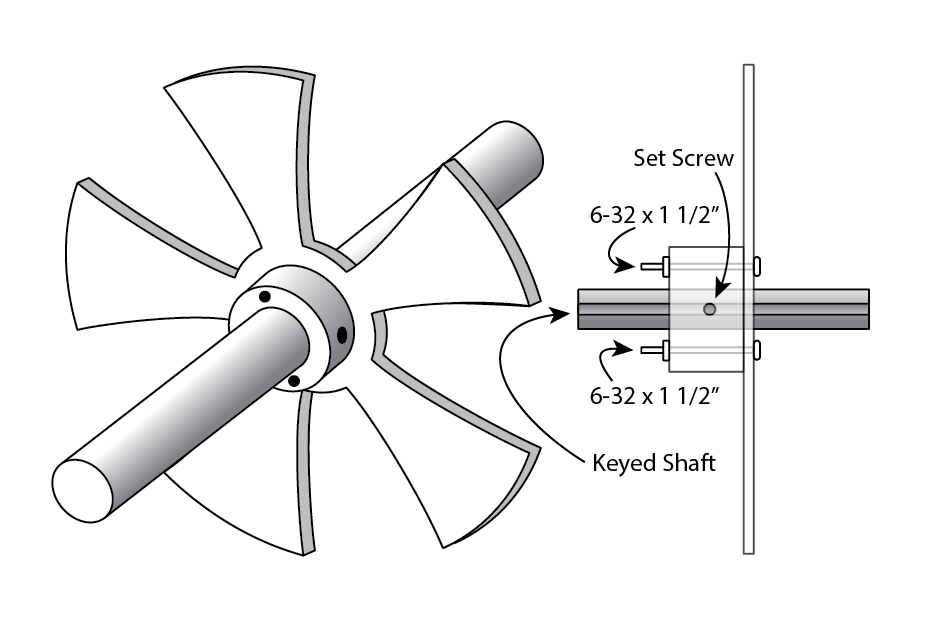
To mount and secure the drum to the shaft, two small holes were drilled in the collars and corresponding holes in the side of the drum plates. The collars were placed inside of the drum, through the spokes. The shaft inserted through the drum side, collar, other collar and the drum side. Then small bolts were inserted through the drum side and into the collar. Nuts were put on the machine screws on the inside (not easy). You could bolt these on before the drum is put on the shaft. It is a bit more difficult to get everything lined up. It's a pain no matter which way you do it.
(Note: if the collars were attached to the sides before they were welded on would have been better. Still an issue tightening them to the shaft).
When I was tightening the machine screws that go through the side plate and into the collar, make sure that they are straight and aligned. I broke six bolts because of alignment issues. They are small and don't like sideways stress. I also used those "locknuts" with the nylon sleeve inside. I lost many of those, trying to get them on. I was assembling this in my wood shop and the sawdust on the floor ate many of them.
Bedplate Building
Bedplates are made in a variety shapes and styles. Some are grooves cut into a solid piece of steel and aluminum. Some are assembled (like mine). Some are floating (like with a Valley Lab Beater) and some are solidly mounted. Here is what it have found over the past four years of use. The blades of the bed plate should have some angle in their relationship to the drum. I have never got a straight answer as to why. Some of the reasons have been, increased maceration, for better flow, less clogging, etc. For what ever the reason, the pulp is made better and quicker with the bedplate blades at an angle. If you are cutting them out of a solid piece, cut them at an angle. I don't have a mill to cut them so I assembled mine.
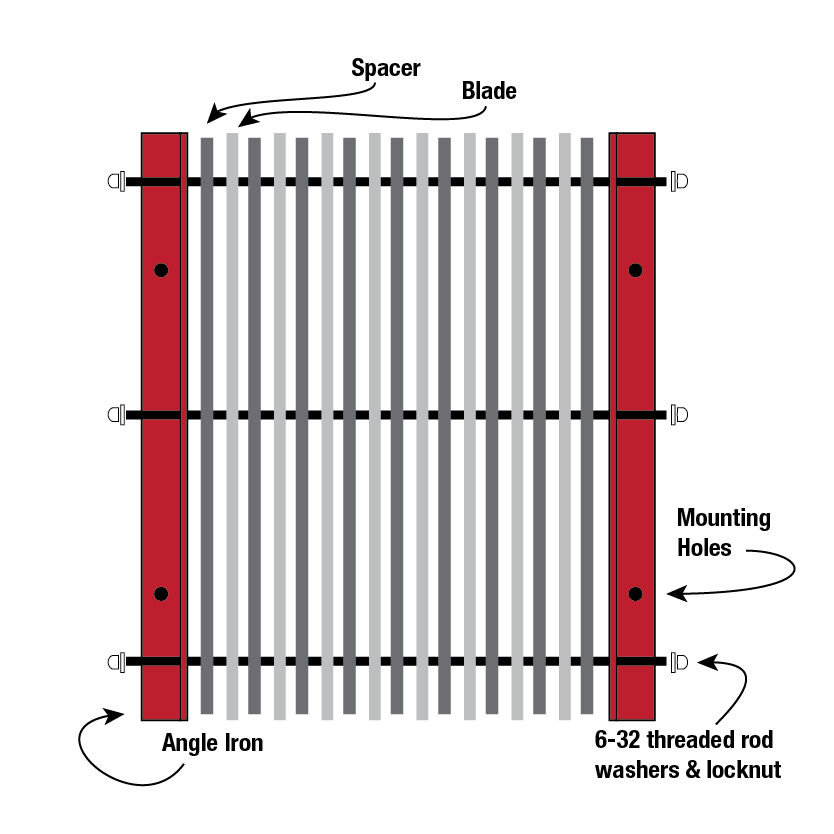
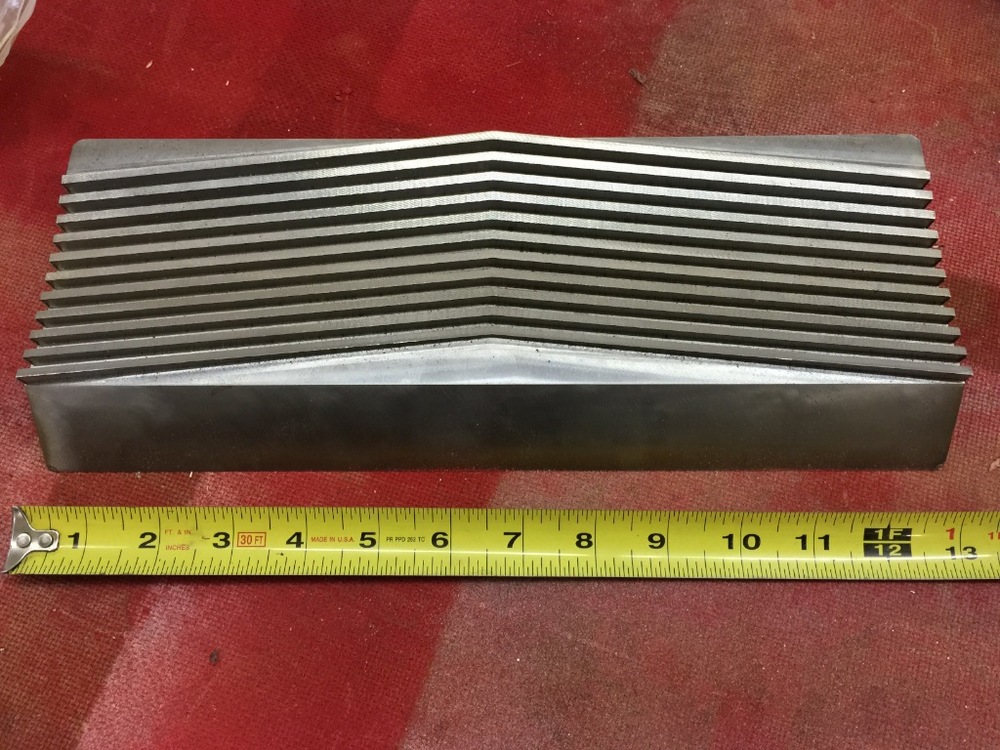
I build this bedplate out of a piece of angle iron (cut into equal pieces) and 1/2" bars of steel for the spacers and 3/4" bars of steel for the blades. Both were 3/16" thick. So the angle iron was to mount the bed plate block to the floor of the beater and the bars were alternating spacer - blade between the angle iron.
OK, as always there was an issue. Since the spacer bars are shorter than the blades (which is good), there is not very much area to drill holes through to bolt them together. In fact, I could not find a machine bolt small enough or long enough to make it all the way through. I had to use a threaded rod in order to get it small enough in diameter and long enough to make it all the way through. The first time, I cut the damn rod too short, so I had to do it again. Also I wasn't able to drill exact holes in 16 bars, 3 holes each. The center is just slightly off. So I worked slowly, adding blades and spacers like building a puzzle. This time the rods are much straighter and tighter. I also found that with some coaxing I might be able to curve the bedplate (just so you know I wasn't able to curve the bedplate).
OK, 4 years after I built the Hollander, I decided to try to make it more effective. In usage, it would get to a height we lovingly called the "lump, lump" stage. That was the sound it would make when the drum was at its lowest point to the bed plate. What was discovered was that the drum/bedplate interaction was really only one blade on the bedplate. It was doing OK for the drum interacting with one blade. So a new summer goal (actually Fall), was to remove the bedplate and somehow grind it so it fit the drum better. One of the traditional ways is to add water with carborundum grit in it. Then run the Hollander with the drum and bedplate in light contact. Can you imagine what a mess you would end up with in the Hollander? You would never get that mess out of the cracks and crevices.
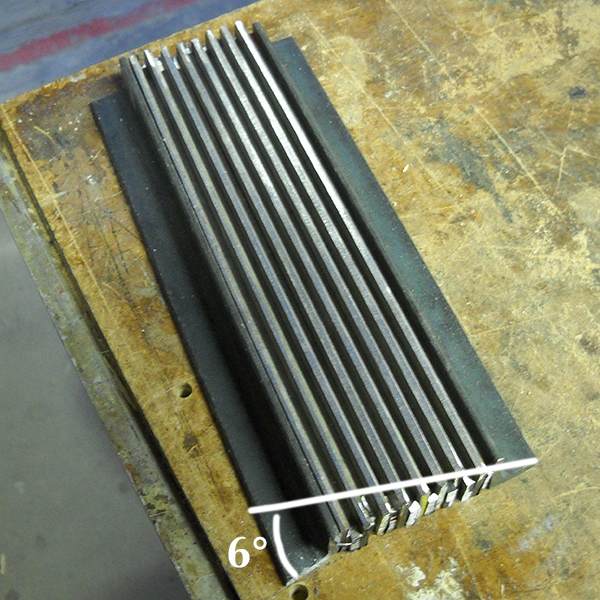
 What I did was find a grinding wheel (60 grit), that was the same diameter as the drum. Then set the bedplate at the required 6° angle and ground away (going slow and testing the curve all the way). It went well and quickly.
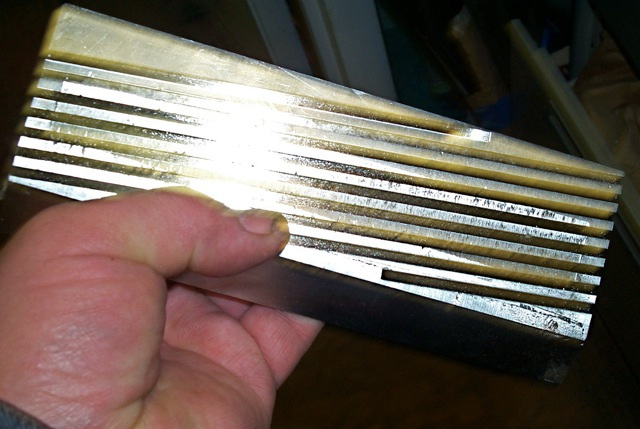
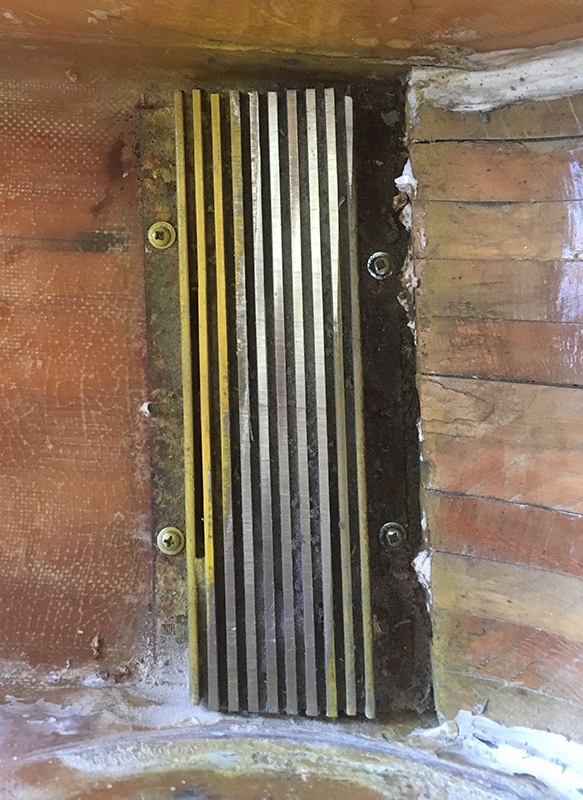
 Just to make sure it was correct, I remounted the bedplate in the Hollander and in order to see what was being sanded on the bedplate, I gave it a quick "spritz" of yellow paint.
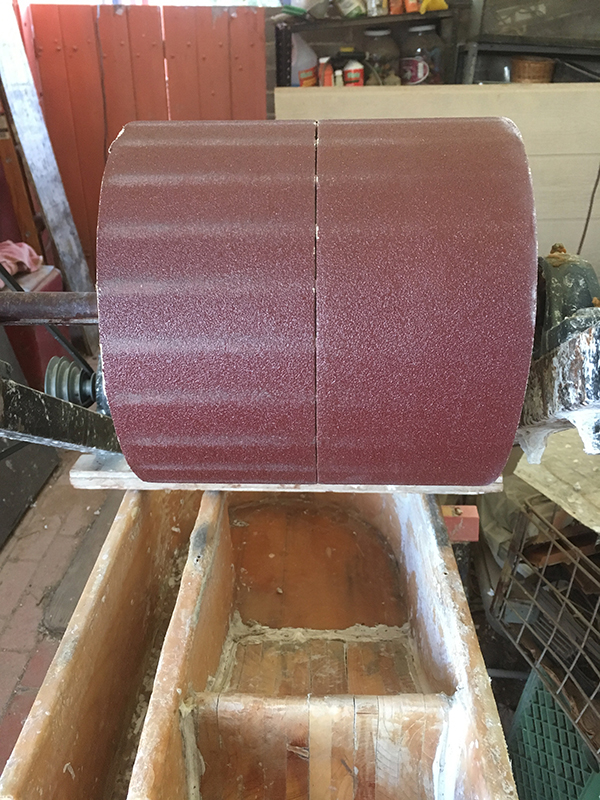 I also wrapped the drum in 80 grit belt sanding belts. Then I lowered the drum until it is in contact with the bedplate and turned it on. This refined the grind and made sure that the two are using the most surface and are much more compatible.
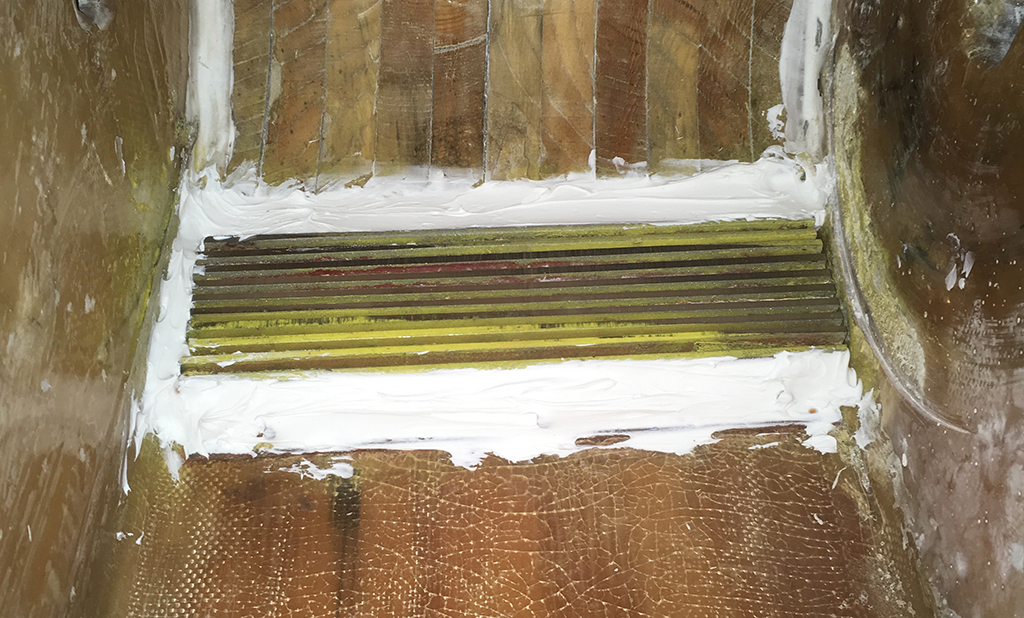
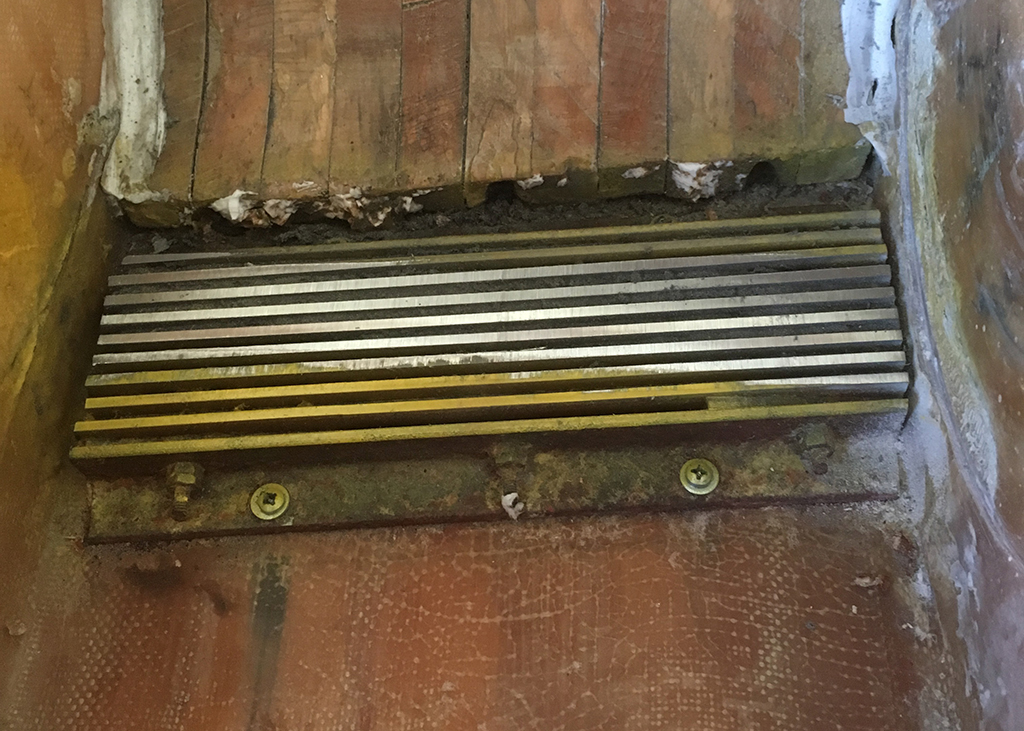 As you can see, it is obvious what was touching on the bedplate and drum.
Just for good measure, I turned the sanding belt around and attached it to the bedplate. This way it polished the blades, sharpened the edges and curved the faces.
In the initial test, I didn't change the procedure of the run. So it took the same amount of time. I also had some waxy box shred that just wouldn't break down. I was hoping to get the time down from 45 min. - 1 hr., down to 30 min. More later.