There are a couple different methods you can employ to press your paper (for home and classroom).
Sponge Press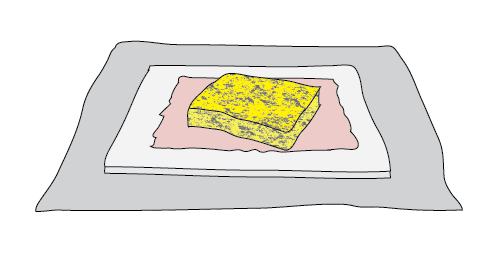 This is not technically a press, but if you are doing this on a small scale (which you probably are since you are on this post). After you couch a single sheet, place a felt (or what ever you are using) or paper towel on top of your freshly couched sheet. With a sponge, press gently at first, then press firmly with as much pressure as possible. Repeatedly wring out your sponge and continue pressing the rest of the sheet. Be careful not to damage the sheet by pressing too hard; still, remove as much water from the sheet as you can. It is also important to press the sheet evenly, so that all of it will dry at the same rate. Have a rolling pin or old paint roller? Use that to press your paper even more.
Boards & Weight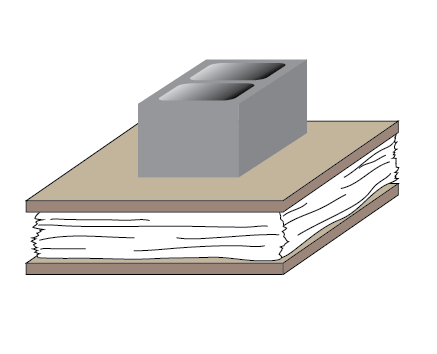 Place another felt on top of your freshly couched sheet. Continue to couch another sheet, layer another felt, and repeat. This creates a "post". Layer one (or two or three or five) final felt(s) and place the post on a wooden board (larger than the post all the way around). Place your post that is between boards on a flat, sturdy surface. Add weight by standing on it or placing bricks or cement blocks on it or weight-lifting plates or I even saw someone make a ramp and drive their car on it (very dangerous, do not drive your car on slippery, wet paper and felts).
Boards & C-Clamps or Bar Clamps
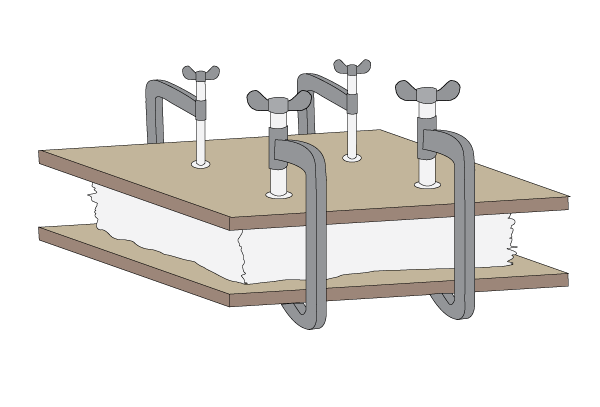 Using two strong hard boards or 1" thick laminated boards (plywood), place your "Post" (stack of paper and felts) between the boards and using four clamps, add one to each of the corners. Tighten until water starts to drain and then a little more. Note: this will bend the boards because your are not clamping from the center. Get your clamps as far in as possible. You might want to protect your wood with plastic wrap or some type of waterproofing solution if you are going to use this method a lot or frequently.
Boards, More Boards and 4 Bolts with Nuts
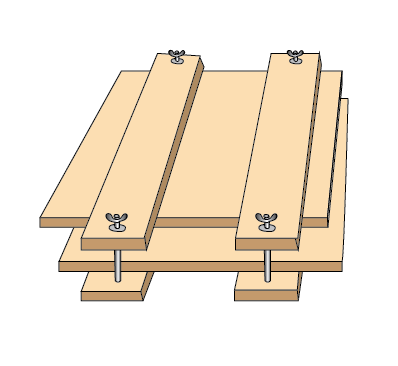 Each version needs more and more DIY skills. This is an adaptation of "Boards & C-Clamps (without the C-Clamps). You still use two strong hard boards or 1" thick laminated boards (plywood or mdf) to place the stack of paper and felts. Instead of clamps, four 1" thick (or thicker, like a 4"x4" so it would have less chance of bowing under pressure). These boards are longer than the boards that hold the post of paper. Put a pair of these boards together, and drill a hole (through both at the same time) near each end of the board the size of the bolts that you purchased to connect the boards together. Make sure that these holes will clear the boards that hold the paper post. You can use nuts and washers that you would tighten with a wrench or Wing nuts and washers for use without a wrench. This will provide very even pressure.
You might want to protect your wood with plastic wrap or some type of waterproofing solution (like Thompsons Wood Seal) if you are going to use this method a lot or frequently.
Boards, Rods and Crank
 Again with the boards. Obtain two fairly substantial boards (1" thickness minimum, 2"-2 1/2" is better by a size larger that the largest paper that you are creating (don't get out of control in size with this, 12" x 12" or 12" X 15" is probably the maximum if you are going to make A4 sheets). If you are using wood, seal it (varnish, spar varnish, Thompsons Wood Seal) so it doesn't warp and stays flat. You also could put a plastic laminate on it as well.
Obtain 4 large bolts or "Thread-All" rods, 12mm or 1/2" and between 10"-18" long with washers and 4 nuts per rod - 16 nuts total. Height all depends on how big a "Post" or stack of paper is.
Bottom Assembly
Drill a 12mm or 1/2" hole about 1" from each corner of the base and countersink them to suit the size of your washers. Put a nut and washer on one end of each rod and poke them up through the countersunk holes.
Assembling the Top
Using the other large board (which doesn't have to be sealed but why not) drill 12mm holes or 1/2" hole about 1" from each corner of the base. These holes do not have to be countersunk. If you have a long enough drill bit, you could drill both boards at the same time ensuring that the holes line up exactly. In the exact center of the top, drill a 1 1/8" to 1 1/4" diameter hole for the Screw hardware. One of the easiest way to accomplish this is to use a "SpeedBore Bit". If you are not using a drill press, take extra care to drill the hole perpendicular to the board in all directions.
The Screw
You can get a shoulder vice screw and the threaded screw receiver, if you can find one. OR get a 1" x 18" zinc plated All-Thread Rod, 1" threaded floor flange, 1 1/8" to 1 1/4" floor flange that is not threaded and a 1" iron threaded tee all from Home Depot for the cheaper easier version. Make sure that the All-Thread rod has the same thread as the floor flange and the threaded tee.
The Pressure Plate
Another large board (like the top and bottom boards) is needed for the pressure plate. It needs to fit inside of the rods that hold the press together in one direction and as big as the bottom board in the other direction. This board should be sealed like the bottom board. In the center, mount the non-threaded floor flange facing up. Note: In the next step, Assembly, some people have made the pressure plate the same size as the top and bottom boards and drilled the same corner holes in it. This allows the pressure plate slides up and down centered between the corners, creating a more even (yet still centered) pressure on the paper.
Assembly
On the bottom board, insert and bolt the All-Thread rods in the corner holes. Slip four long pieces of PVC, steel or copper tube over the threaded rods, then top with washers. These tubes act as spacers and keep the top and bottom parallel. The length of these tubes depends on how thick the top and bottom boards are. Next comes the pressure plate (if it is going to slide on the corner tubes. If not, the pressure plate can go in anytime). On the bottom of the top board, center over the hole, the 1" threaded floor flange and fasten it to the board. The whole thing should now just bolt together − the top slips over the threaded rod (with the flange facing down) and is bolted down with four nuts and washers. Insert the 1" All-Thread rod into the 1" iron threaded tee. Insert the All-Thread assembly into the center hole of the top board. With a wooden dowel inserted through the tee, carefully twist the All=Thread into the board until it comes out the other side.
To use
Insert the paper "post" into the press. Add the pressure plate. Screw the big screw down to the unthreaded flange mounted on the pressure plate. Continue to screw the press down until water drains out of the paper "post". When the water quits draining (or you can't screw the press any farther), you're done. Now just wait.
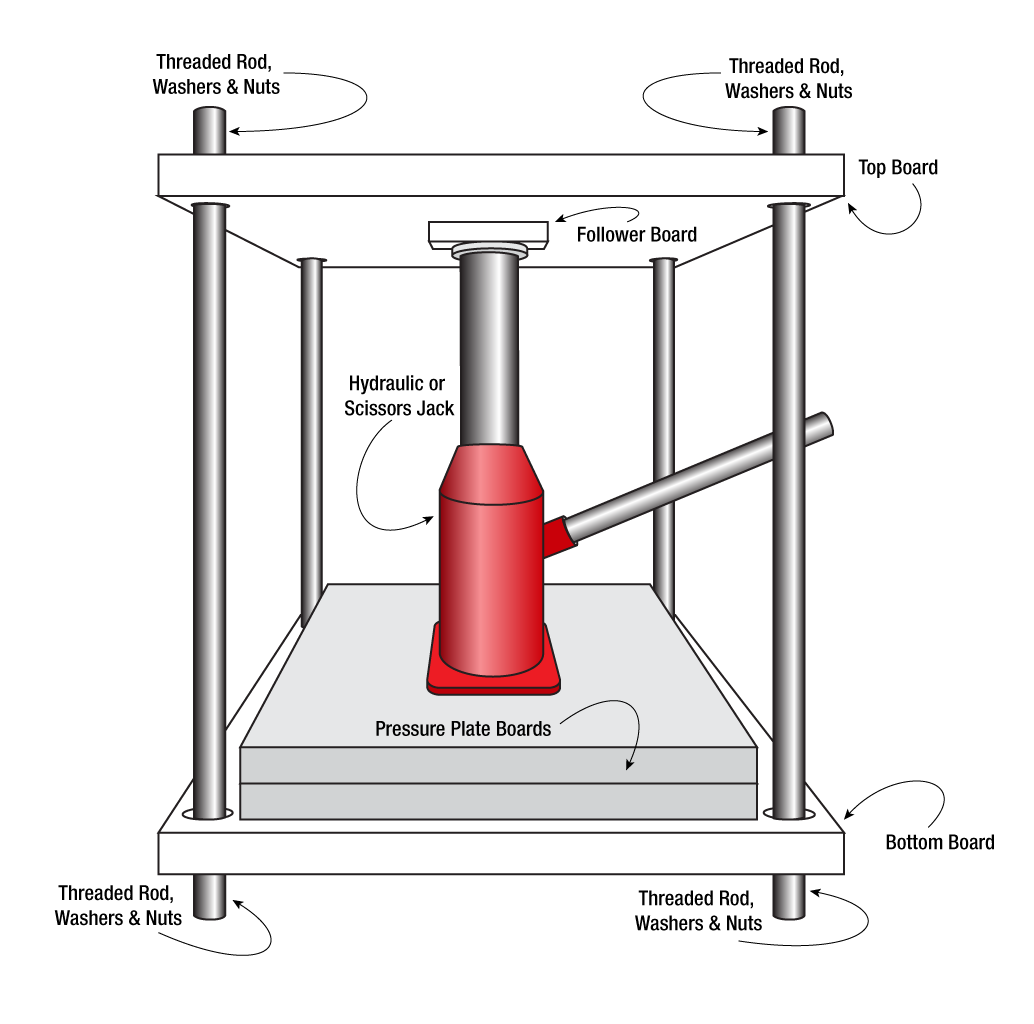
Boards, Rods, Nuts, More Boards & a Jack
 Still another press with the boards. Obtain two fairly substantial boards (1" thickness minimum, 2"-2 1/2" is better by a size larger that the largest paper that you are creating (don't get out of control in size with this, 12" x 12" or 12" X 15" is probably the maximum if you are going to make A4 sheets). If you are using wood, seal it (varnish, spar varnish, Thompsons Wood Seal) so it doesn't warp and stays flat. You also could put a plastic laminate on it as well.
Obtain 4 large bolts or "Thread-All" rods, 12mm or 1/2" and between 10"-18" long with washers and 4 nuts per rod - 16 nuts total. Height all depends on how big a "Post" or stack of paper is.
Bottom Assembly
Drill a 12mm or 1/2" hole about 1" from each corner of the base and countersink them to suit the size of your washers. Put a nut and washer on one end of each rod and poke them up through the countersunk holes.
Assembling the Top
Using the other large board (which doesn't have to be sealed but why not) drill 12mm holes or 1/2" hole about 1" from each corner of the base. These holes do not have to be countersunk. If you have a long enough drill bit, you could drill both boards at the same time ensuring that the holes line up exactly.
The Pressure Plate
Another large board (or two boards glued together) is needed for the pressure plate. It needs to fit inside of the rods that hold the press together in one direction and as big as the bottom board in the other direction. This board should be sealed like the bottom board.
The Jack
Obtain, at least, a 4 ton bottle jack or a scissor jack from your car (not as good as a bottle jack). You can get a bigger hydraulic jack but don't exceed the strength of your wood top and bottom boards and pressure plate boards. A bigger jack could easily break the boards if they are not substantial enough. Use a smaller stack of boards as a jack top follower (to protect the top board).
To use
Insert the paper "post" into the press. Add the pressure plate. Add the jack and the follower. Start pumping (or screwing) the jack until it makes contact. Continue to pump the jack up until water drains out of the paper "post" (look out for your shoes. The water will start draining as soon as you put the jack in). When the water quits draining (or you can't pump the jack any farther), you're done. Now just wait.
Lever Press
 This is usually used for pressing the water out of cheese but can be adapted to press about anything.
It consists of a long arm connected to a fixed post on a base. The arm has a post with a follower on the bottom. The paper post (between two wooden boards) goes on the base with the follower on top of it. By adding weight to the arm, near the end, the pressure increases at the follower. You can hang metal weights at the end or gallon jug(s) of water or a ratchet strap from the end of the arm to the base. Leave the post in the press for a couple of days, increasing the pressure each day (if possible). You can find out how much pressure you are creating by putting a scale under the follower.
This is usually used for pressing the water out of cheese but can be adapted to press about anything.
It consists of a long arm connected to a fixed post on a base. The arm has a post with a follower on the bottom. The paper post (between two wooden boards) goes on the base with the follower on top of it. By adding weight to the arm, near the end, the pressure increases at the follower. You can hang metal weights at the end or gallon jug(s) of water or a ratchet strap from the end of the arm to the base. Leave the post in the press for a couple of days, increasing the pressure each day (if possible). You can find out how much pressure you are creating by putting a scale under the follower.
Vacuum Press
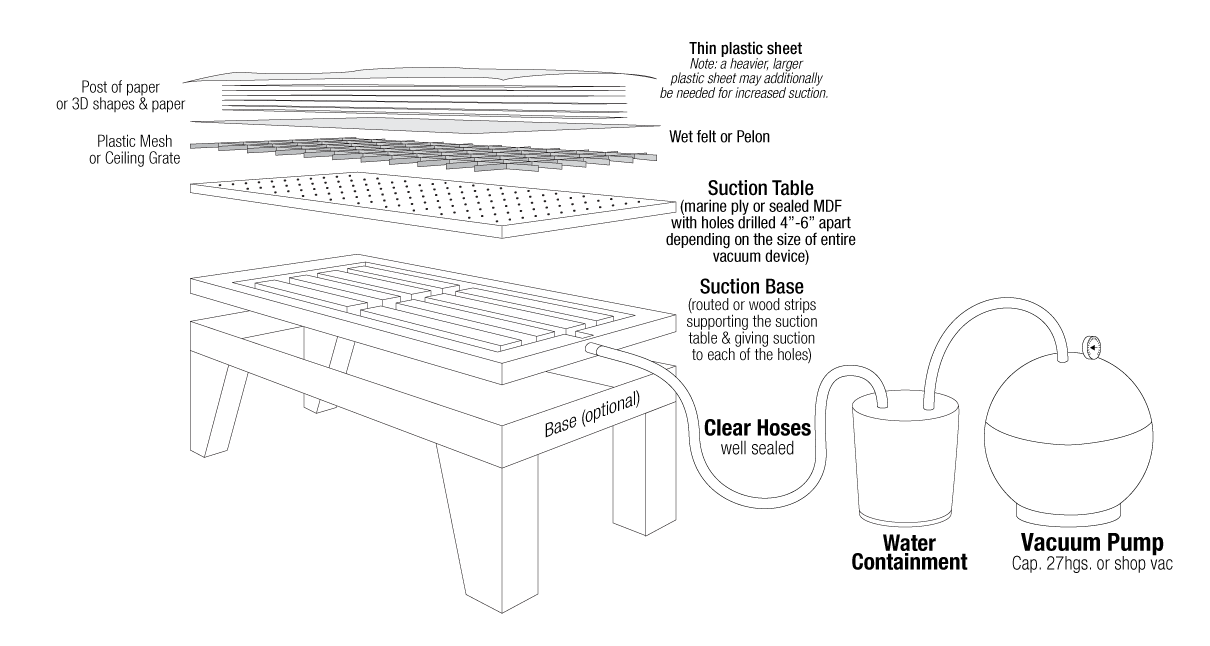
During the resurgence of papermaking as an art medium in the 1970s, artists began “pushing the medium,” developing different ways to work with pulp and paper. One of the innovations was the vacuum table: a tabletop with small holes in its surface, a holding tank underneath, and a connection for a strong wet-dry vacuum. Plastic is draped over sheets of paper lying on the table surface, and when the vacuum is attached and turned on, it sucks the plastic down onto the sheet, drawing water out. This system can press very large sheets of paper — which would be difficult, if not impossible, to fit into a hydraulic press (not to mention lifting them into it) — as well as high- and low-relief sheets and sculptures.
There papermakers that use the "vacuum table" instead of a press. Less big, specialized equipment. You can also use vacuum methods with small paper casting molds to remove the initial water from the pulp. You can make a simple vacuum eliminator by placing your mold on a wire screen or plastic lighting mesh, then the mold. Apply sheets of freshly made paper (or press drained pulp into the mold). Use a fair amount of sheets so high relief (or deep relief) is well covered. Those are the areas that will become thin, first. Add a felt (or Pelon) over the mold and paper. Cover with a plastic garbage bag. Put the opening to the bottom and connect the nozzle of a wet/dry shop vac to the bag. With the piece well supported, turn on the vac and suck the water out (if your hose is clear, you will be able to see when the water stops). Remove bag and let air dry or place in the oven at the lowest temperature (170°).
Below is a exploded drawing of a simple vacuum table.