In testing the beater I found the leak points, the weak points, and the capacities and items that need to be improved…
So when I was designing and planning the beater, I did some calculations (see Hollander Beater Math) and found the depth, width and etc. to get me the volume I wanted. First I just added water, about 7 gallons. It leaked under the backfall mounting and the left (looking from back to front) bearing shaft slot. The backfall leak was easy to fix with a little silicon in the holes that were leaking and put the hold-down screws back in. The slot leak was kinda fixed by leveling the beater (back to front and left to right). OK time for a test run! (Sorry about the antique phone quality.)
Refilled the beater with 7 gallons of water. I weighed out 3 lbs. of fiber (shredded waste paper and a sheet of cotton linter). I turned on the beater with the drum at a higher position, and added the shred slowly. Remember the "waterfall effect" from a previous post? Well this is where the waterfall shield came into play. Every 15 minutes, I dropped the height 1 full turn of the height bolts. After about 3 hours, it was close to being done. The test is a mason jar (1/2 pint) filled with water and 1 Tbs. of the pulp in the beater. Shake the jar vigorously. Hold it up to a light source (like the sun) and see what the pulp looks like. If it is free of big chunks and threads and looks like a smooth mixture, it's done! If not keep beating with the drum at its lowest point checking every 15 minutes.
When it tests good, lift the drum with the height screws up, so it is at its original starting point (hydration stage), and add your sizing, if desired. Originally since I was making an original medieval type of pulp, I used liquid laundry starch for sizing (1/2 cup in a qt. of water, shaken and added to the pulp). I had people watercoloring on it, painting, markering, inking and such. There were a couple of people who were heavy handed with their high-flow fountain pen. They needed more sizing. So I changed to a professional, modern sizing AKD (Alkyl Ketone Dimer from Twinrocker paper). You use less and it makes a harder sheet but still good for watercolor and paint. Great for inking.
Additional Notes: - Since I have been using this beater for about four years and I made some improvements to the baseplate/drum relationship, the time has been drastically reduced. Plus I am using less shred. 6.5 gal. of water to start. 2.5 - 2.7 lbs. of shred boiled for an hour or (easier) soaked in a 5 gal bucket overnight. 15 minutes of hydration stage (drum up), 15 minutes with the drum almost at the lowest point (first pass), 15 minutes lump, lump (the lowest point of the drum and thats the sound that it makes). Test and if good, raise the drum up, add the sizing and run for 15 more minutes. About an hour. To keep things flowing well you may have to add another half to full gallon of water over the course of the hour. The pulp really absorbs the water. You can get 8.5 to 10 gals. of pulp (half-stuff).
So reading through this blog, you can tell that there are some issues with pulp and mystery unprocessed shredded material that shows up at the end of processing. I always thought it was from not cleaning the beater. Nope.
It seems to come from hidden areas that release their cache of unprocessed shred during draining.
So I my constant search for improvement of everything that I do, I ran across an article in Hand Papermaking Newsletter 133, January 2021, written by the amazing David Renia's wife about "Know Your Papermaking Lingo". She refers to these unprocessed clumps of shred as lodgers and two things help get rid of these. I felt not so alone if the professional David Renia is experiencing the same issues that I am facing!
One addition is bangers added to the side of the drum that keep the space between the drum and the sides very small. I believe his are metal, mine are rubber. I am using rubber epoxied to the drum for a test first.
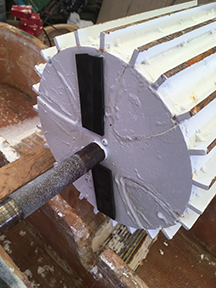

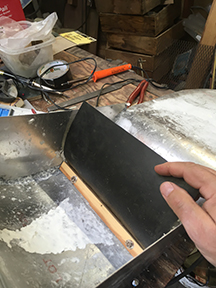
The number two adjustment is on the "doctor" blade. This term comes from the printing industry to remove excess ink. I installed mine without knowing David Renia did the same thing, for the same purpose. The slurry kept coming over the drum instead of going over the backfall (which I still think is too tall). I noticed that my doctor blade didn't go to the edges of the shield, so slurry was getting behind the blade and sticking to the shield until there was nothing keeping it up there.
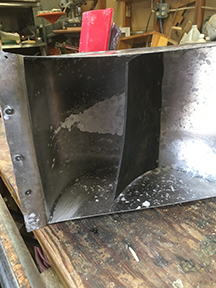
The unprocessed lodgers just dropped off the inside of the shield into the processed, perfect pulp, wrecking it. This is something that you never see until you are sheet-forming. Darn! You'll notice I also replaced the clear shield sides with solid aluminum. It was fun to see the pulp but works better with solid sides. I used that "aluma-rod" that allows you to braze aluminum. Great stuff.
If you want to learn about the results go to VG Paper on Facebook